Sunday, January 19, 2025

Shed building tips for beginners

Building Your First Shed: A Beginner's Guide

So, you're thinking about building a shed? That's awesome! It's a fantastic project that can really boost your property value and give you that extra storage space you've been craving. But maybe the thought of it all feels a bit overwhelming. Don't worry, you're not alone! Building a shed can seem daunting, but with a bit of planning and these tips, you'll be well on your way to enjoying your brand new, perfectly sized storage solution.

Planning is Key: Laying the Foundation for Success

Before you even think about grabbing a hammer, you need a solid plan. This isn't just about sketching something on a napkin (although that can be a fun first step!). Proper planning saves you time, money, and a whole lot of frustration down the line.

Choosing the Right Location

Where will your shed live? Consider these factors:

  • Accessibility: Will you need easy access for a vehicle to bring in materials? Do you want it close to the house, or tucked away in a more secluded spot?
  • Sunlight: Too much sun can make the shed unbearably hot. Too little, and it might stay damp.
  • Drainage: Make sure the ground is relatively level and drains well to prevent water damage.
  • Utilities: Think about whether you’ll need electricity or water access â€" and if so, how far away the nearest connections are.
  • Local Regulations: Check with your local council or homeowner's association about any permits or restrictions on shed construction. This might include size limits, materials, and distance from property lines.

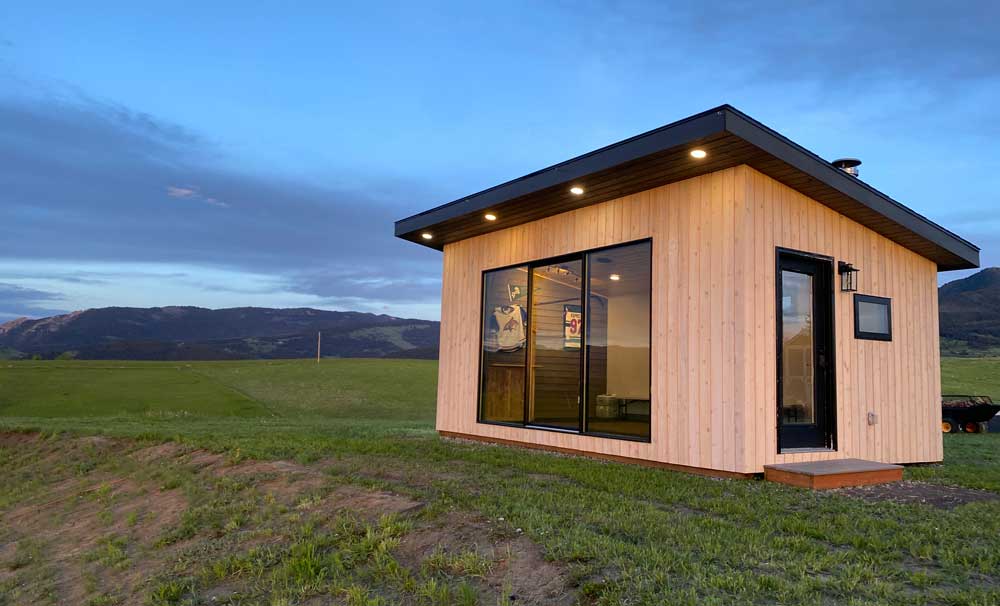
Shed Size and Design

How much stuff do you need to store? Measure it all out! A bigger shed might seem like a good idea, but it also means more materials and more work. Start with a realistic assessment of your storage needs and then choose a size accordingly. Consider the style too; do you want a simple gable roof or something more elaborate? Plenty of free shed plans are available online to browse for inspiration. Don't be afraid to adapt a plan to suit your needs.

Choosing Your Materials

This is where things can get a bit overwhelming, but remember to keep it simple for your first shed! Pressure-treated lumber is a good option for the frame because it’s resistant to rot and insects. For siding, you have several choices, from simple plywood to more attractive options like vinyl or metal. Consider your budget and aesthetic preferences.

Gathering Your Tools and Materials

Now for the fun part â€" shopping! Make a detailed list of every tool and material you need. Don't forget the little things. Rushing back to the hardware store mid-project is seriously frustrating. A good checklist will save you from that headache. Here's a general overview, but your exact needs will vary depending on your shed design:

  • Measuring Tape, Level, Square, and Chalk Line â€" These are essential for accurate measurements and ensuring everything is straight.
  • Saw (Circular saw and hand saw are good to have) â€" For cutting lumber to size.
  • Drill and Drill Bits â€" For pilot holes and driving screws. A cordless drill makes the job easier.
  • Hammer and Mallet â€" For driving nails (though screws are preferable for sheds) and aligning timber.
  • Screws and Nails â€" Choose exterior-grade screws for durability.
  • Post Hole Digger or Auger â€" For setting the foundation posts.
  • Shovel and Wheelbarrow â€" For moving materials and preparing the ground.
  • Safety Gear: Safety Glasses, Work Gloves, Hearing Protection â€" You absolutely MUST prioritize safety!

Building the Foundation

A solid foundation is crucial for a long-lasting shed. There are several ways to approach this, from a simple concrete slab to a more complex pier and beam system. For beginners, a simple concrete pier foundation is usually a good choice. This involves digging holes, setting concrete piers, and then attaching your base plates.

  • Digging the Holes: Use your post hole digger to dig holes that are deep enough and wide enough for your piers. The depth will depend on your local frost line and the type of soil.
  • Setting the Piers: Fill the holes with concrete, ensuring the piers are level. Use a spirit level to check this regularly.
  • Attaching the Base Plates: Once the concrete has set, attach your base plates (pressure-treated lumber) to the piers using appropriate fasteners.
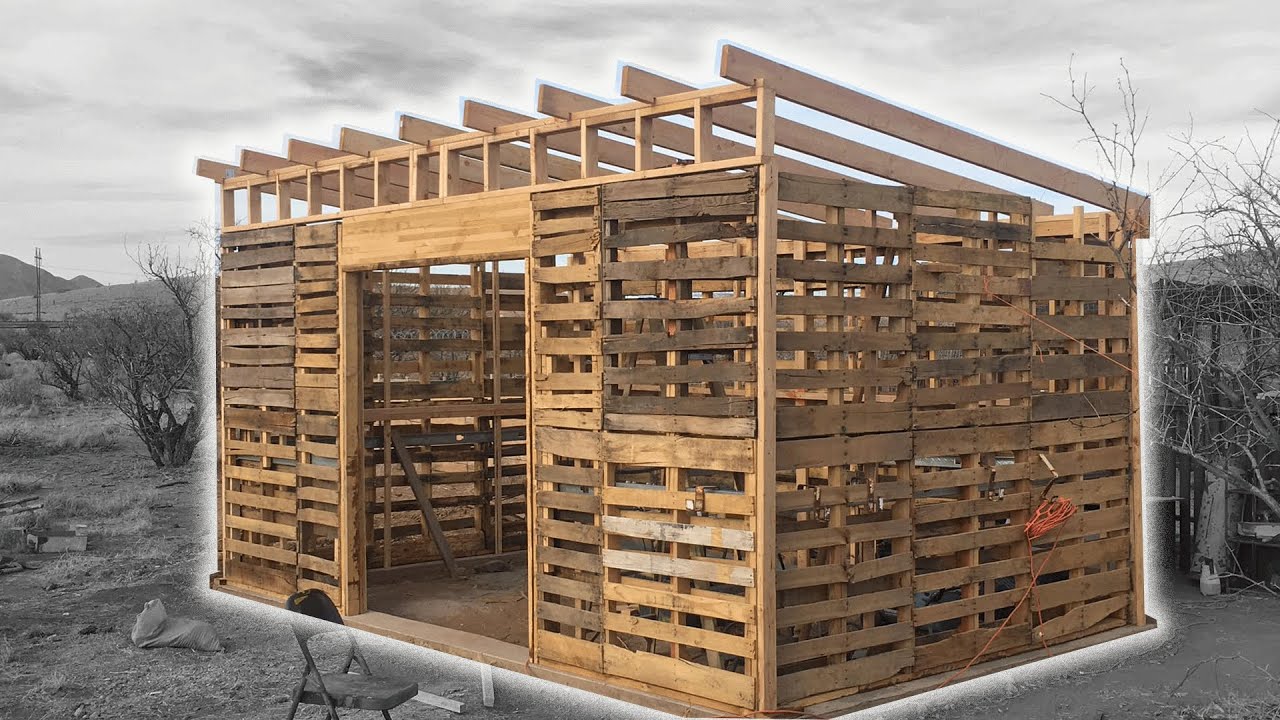
Framing the Shed

This is where the bulk of the work happens. You'll be building the frame that will support the walls and roof. Carefully follow your plans, paying close attention to the dimensions and angles. Squareness is crucial here! Take your time, double-check measurements, and don’t rush this stage.

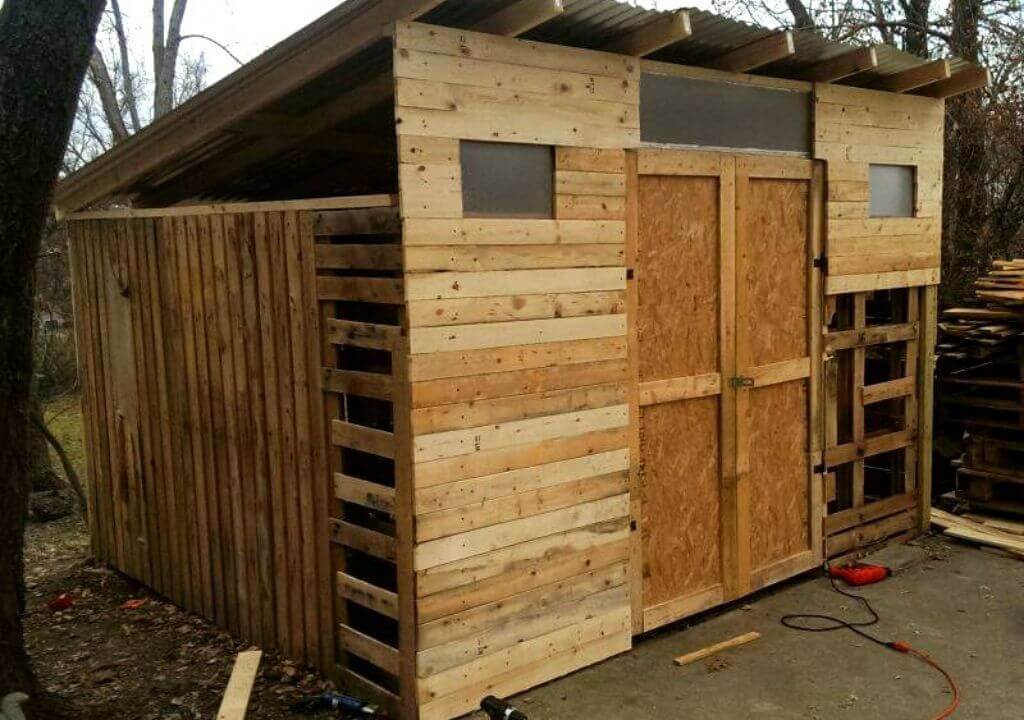
Sheathing, Siding, and Roofing

Once the frame is up, you'll add sheathing (plywood or OSB) to create a solid surface for the siding. This will also provide extra stability. Then, install your chosen siding material. Finally, complete the roof structure and install the roofing material. Again, carefully follow your chosen plans, and don't hesitate to ask for help if you're unsure about any aspect of the process.

Finishing Touches

Once the structure is complete, it's time to add the finishing touches! This might include installing a door and windows, painting or staining the exterior, and adding any interior shelving or features you desire.

Commonly Asked Questions

Q: How long does it take to build a shed?

A: This varies greatly depending on the shed's size and complexity, your experience level, and the weather. A simple shed might take a weekend for an experienced builder, while a more complex project could take several weeks for a beginner.

Q: How much does it cost to build a shed?

A: The cost depends heavily on the size, materials, and complexity of the design. You can build a simple shed for a few hundred dollars, while more elaborate structures can cost thousands.

Q: Do I need a permit to build a shed?

A: This depends on your location and local regulations. Check with your local council or homeowner's association before starting construction.

Q: What if I make a mistake?

A: Don't panic! Mistakes happen. If you make a significant error, it might be necessary to redo that section. It's always best to take your time and double-check your work at each stage.

Q: Can I build a shed by myself?

A: It's possible, especially for smaller, simpler sheds. However, having a helper can be incredibly beneficial, especially for lifting heavy materials and holding things in place.

Building a shed is a rewarding experience, even if it presents some challenges along the way. Remember to prioritize safety, plan carefully, and take your time. Good luck, and happy building!

Continue lendo

Quick and easy shed project solutions

Expedient Shed Construction: Practical Solutions for Rapid Project Completion

The construction of a shed, while a seemingly straightforward undertaking, can quickly become a protracted and complex endeavor if not approached with a strategic and efficient methodology. This document outlines several streamlined approaches to shed construction, emphasizing practicality and expediency without sacrificing structural integrity or aesthetic appeal. The following strategies prioritize readily available materials, simple construction techniques, and minimal specialized tooling, facilitating rapid project completion for even novice builders.

Optimizing Shed Design for Rapid Construction

The foundation of efficient shed building lies in intelligent design choices. Overly ambitious designs, while potentially aesthetically pleasing, often lead to prolonged construction times and increased complexity. Focusing on a simplified, functional design is crucial for rapid completion.

Minimizing Dimensions and Complexity

Smaller shed footprints significantly reduce material requirements and construction time. Consider the intended use of the shed and opt for the smallest dimensions that adequately accommodate this purpose. Avoid intricate architectural details such as gables, dormers, or elaborate overhangs, as these add considerable complexity to the framing and roofing stages.

Standardized Materials and Pre-fabricated Components

Employing standardized lumber sizes (e.g., 2x4s, 4x4s) simplifies the cutting and assembly processes. Furthermore, incorporating pre-fabricated components such as pre-cut roofing trusses, pre-hung doors, and pre-assembled window frames drastically reduces on-site construction time. These pre-fabricated elements are readily available from most lumberyards and home improvement centers, offering significant time savings compared to constructing these components from scratch.

Choosing Appropriate Construction Materials

Material selection significantly influences construction speed. Pressure-treated lumber offers durability and requires minimal additional treatment, reducing construction time compared to untreated lumber which necessitates additional steps like priming and painting. Similarly, using readily available roofing materials like asphalt shingles simplifies the roofing process compared to more complex options like metal roofing or tile.

Streamlined Construction Techniques for Expedited Building

Beyond design, the choice of construction techniques significantly impacts project duration. Prioritizing simplicity and efficiency in construction methodology is vital for achieving a rapid project completion.

Simplified Foundation Systems

Complex foundations, such as poured concrete slabs or elaborate pier-and-beam systems, add considerable time and expense to the project. Consider simpler alternatives like a gravel base, a pre-fabricated concrete slab, or even a concrete pier foundation, depending on local soil conditions and building codes. These simplified foundations can be constructed in a fraction of the time required for more complex systems.

Efficient Framing Techniques

Employing pre-fabricated wall panels or using a simple platform framing technique can significantly accelerate the wall construction phase. Pre-fabricated panels are assembled off-site and erected on the foundation, greatly reducing on-site assembly time. Platform framing, while requiring more on-site construction, remains relatively straightforward and efficient, particularly for smaller sheds.

Rapid Roofing Methods

Roofing is often a time-consuming aspect of shed construction. Utilizing pre-fabricated trusses significantly accelerates this phase. These trusses are delivered ready-to-assemble, reducing the time spent cutting, assembling, and bracing rafters. Choosing easy-to-install roofing materials like asphalt shingles further streamlines the process. Proper planning and accurate measurements are paramount to ensure a smooth and efficient roofing installation.

Essential Tools and Equipment for Expedient Shed Construction

The selection of appropriate tools and equipment directly impacts construction efficiency. While specialized tools can enhance precision, focusing on a core set of essential tools ensures a swift and efficient construction process.

Power Tools for Increased Efficiency

Investing in a few key power tools greatly enhances construction speed. A circular saw is indispensable for cutting lumber, while a drill/driver simplifies fastening and assembly. A nail gun, if accessible, significantly accelerates the fastening process. However, even without these power tools, the project remains feasible, though it will require more manual labor and time.

Essential Hand Tools

Even with power tools, a selection of hand tools remains indispensable. A tape measure, level, hammer, and screwdrivers are essential for accurate measurements, precise alignment, and secure fastening. A square is crucial for ensuring accurate angles in framing, and a saw (hand saw or reciprocating saw) will be necessary for any on-site cutting adjustments.

Managing the Project for Optimal Time Management

Careful project planning and management are crucial for ensuring timely completion. A well-defined plan, coupled with efficient resource allocation, facilitates rapid construction.

Detailed Planning and Material Acquisition

Developing a detailed construction plan, including material lists, cutting diagrams, and assembly instructions, significantly minimizes on-site delays. Acquiring all necessary materials beforehand avoids interruptions during the construction process. Accurate material estimations are critical to avoid delays caused by material shortages.

Utilizing Pre-assembled Components

As previously mentioned, utilizing pre-fabricated components such as doors, windows, and trusses significantly reduces on-site construction time. These ready-to-install elements eliminate the need for extensive on-site fabrication, leading to a more efficient and rapid project completion.

Conclusion: A Balanced Approach to Shed Construction

Constructing a shed quickly does not necessitate sacrificing quality or structural integrity. By focusing on simplified designs, efficient construction techniques, and proper project management, even novice builders can complete a shed project expeditiously. The strategies outlined above prioritize practicality and ease of construction, allowing for rapid completion without compromising the functionality and durability of the finished structure. Remember that adhering to local building codes and safety regulations is paramount throughout the construction process. With careful planning and execution, building a functional and aesthetically pleasing shed can be a manageable and rewarding endeavor completed within a reasonable timeframe.

Continue lendo

Friday, November 22, 2024

How to Build a Lean-To Shed DIY for Your Outdoor Space

Constructing a Lean-To Shed: A Comprehensive DIY Guide

This comprehensive guide provides a detailed, step-by-step instruction manual for constructing a lean-to shed. A lean-to shed, characterized by its simple, single-slope roof design, presents a relatively straightforward yet rewarding DIY project for homeowners seeking to enhance their outdoor storage capabilities. While requiring some basic carpentry skills and readily available tools, the construction process, when meticulously followed, yields a durable and functional addition to any property. This guide covers all aspects, from initial planning and material acquisition to final finishing touches.

Phase 1: Planning and Preparation

Before embarking on the construction, thorough planning is paramount. This phase encompasses several crucial steps, ensuring a smooth and efficient building process.

Site Selection and Assessment

The chosen location dictates several aspects of the shed's design and construction. Consider factors such as:

  • Proximity to power sources: If electrical outlets are needed within the shed, proximity to existing circuits is essential.
  • Accessibility: Ensure easy access for both construction and future use. Consider the proximity to pathways and potential obstructions.
  • Ground conditions: Evaluate the ground's stability. Level ground is ideal, while uneven terrain may require leveling before construction.
  • Sunlight and shade: Determine the amount of sunlight and shade the site receives throughout the day. This influences the need for ventilation and potential temperature regulation within the shed.
  • Local building codes and regulations: Consult local authorities to ascertain any relevant building codes or permits required for the construction of the shed.

Design and Material Selection

The design is influenced by the intended use and the available space. Key considerations include:

  • Dimensions: Determine the desired length, width, and height of the shed. The size should align with your storage needs and the available space at the chosen location.
  • Roof pitch: The slope of the roof impacts water runoff. A steeper pitch ensures better drainage, particularly in areas with high rainfall.
  • Building materials: Common materials include pressure-treated lumber for the frame, plywood for sheathing, roofing felt, and your chosen roofing material (e.g., asphalt shingles, metal roofing).
  • Foundation: Decide on the type of foundation. Options range from a simple concrete slab to a more elaborate gravel base. The choice depends on the ground conditions and the shed's weight.

Tool Acquisition and Preparation

Ensure you have all necessary tools before commencing construction. Essential tools include:

  • Measuring tape and level: Crucial for accurate measurements and ensuring a level structure.
  • Circular saw and hand saw: For cutting lumber to the required dimensions.
  • Drill and driver: For fastening the various components.
  • Hammer: For driving nails or using a nail gun.
  • Shovel and post hole digger (if needed): For preparing the foundation.
  • Safety glasses and work gloves: Essential for protecting yourself during construction.

Phase 2: Foundation and Framing

This phase focuses on establishing a solid foundation and constructing the shed's frame. A sturdy frame is critical for the structural integrity of the lean-to.

Foundation Construction

The foundation type depends on your site conditions and personal preference. A simple gravel base is suitable for lighter sheds, while a concrete slab offers greater stability. For a gravel base, level the ground, lay down a layer of gravel, compact it, and then place pressure-treated lumber to form the base for the frame.

Framing the Walls and Roof

The frame forms the skeleton of your shed. Construct the back wall first, ensuring it's plumb and level. Then, erect the side walls, attaching them securely to the back wall and the supporting structure. The front wall can be shorter, depending on your desired roof pitch. Construct the roof rafters, ensuring they're properly spaced and secured to the back wall and the front wall.

Sheathing the Frame

Once the frame is complete, sheath the walls and roof with plywood. This provides a solid surface for the exterior cladding and roofing material. Ensure proper overlap between sheets to prevent water penetration. Use appropriate fasteners, ensuring they are driven flush with the surface to avoid damage to the roofing material.

Phase 3: Exterior Finishing and Roofing

This phase involves applying the exterior cladding and roofing, crucial for protecting the shed from the elements.

Exterior Cladding

Apply the chosen exterior cladding. Options include siding, shiplap, or even corrugated metal. Ensure proper overlap and secure fastening to maintain weather resistance. Consider using weatherproof sealant around windows and doors (if applicable) for added protection.

Roofing Installation

Install the roofing material, ensuring it's properly overlapped to prevent leaks. Start from the bottom and work your way up. Secure the roofing material with appropriate fasteners, ensuring they are weatherproof. Install flashing around any chimneys or vents (if applicable).

Phase 4: Interior Finishing and Final Touches

This final phase enhances the shed's functionality and aesthetics.

Interior Walls and Flooring

Apply interior sheathing, such as plywood or drywall. This provides a smooth surface for painting or wallpapering. Install flooring if desired, considering material appropriate for shed use (e.g., concrete, plywood, or vinyl).

Ventilation and Lighting

Install vents for proper ventilation, particularly essential in warmer climates. Incorporate lighting to enhance visibility inside the shed. Use weatherproof fixtures to ensure durability.

Phase 5: Safety and Maintenance

Safety and regular maintenance are crucial for the longevity of your lean-to shed.

Safety Precautions

Always use appropriate safety gear, including safety glasses, work gloves, and hearing protection. Follow safe practices when using power tools and working at heights. Ensure the structural integrity of your shed before storing heavy items.

Regular Maintenance

Regular inspections and maintenance are crucial. Check for any damage to the structure, roof, or cladding. Address any leaks or structural issues promptly. Consider annual repainting or restaining of exterior surfaces to maintain weather resistance.

By following these detailed instructions and prioritizing safety throughout the construction process, you can successfully build a durable and functional lean-to shed, enhancing your outdoor space and providing valuable storage solutions.

Continue lendo

A Modern Spin on the Classic Lean-To Shed: How to Build with Style

A Modern Spin on the Classic Lean-To Shed: How to Build with Style

A Modern Spin on the Classic Lean-To Shed: How to Build with Style

The lean-to shed, a venerable structure characterized by its simple, single-slope roof design, has long served as a practical solution for supplemental storage and workspace. However, its inherent practicality needn't preclude aesthetic appeal. This article delves into the construction of a modern lean-to shed, emphasizing design elements that elevate this humble structure to a stylish and functional addition to any property. We will explore material selection, construction techniques, and design considerations to guide you through the process of creating a lean-to that seamlessly integrates with contemporary architectural styles.

I. Design and Planning: Laying the Foundation for a Stylish Shed

Before embarking on the construction process, meticulous planning is paramount. This phase involves several critical steps that will significantly influence the final outcome. A well-defined design not only ensures structural integrity but also enhances the aesthetic integration of the shed within its surrounding environment.

A. Site Selection and Orientation

Choosing the optimal location for your lean-to is crucial. Consider factors such as proximity to existing structures, access to utilities (if required), and sunlight exposure. Ideally, the shed should be positioned to maximize natural light and minimize shading, especially if you intend to use it as a workshop or hobby space. Analyzing the prevailing wind direction will help determine the best orientation for minimizing wind load on the roof.

B. Shed Dimensions and Functionality

The dimensions of your lean-to will be dictated by its intended use. A compact design may suffice for simple storage, while a larger structure might be necessary for a workshop or gardening shed. Carefully consider the necessary storage capacity or workspace dimensions, factoring in ample room for maneuverability. Detailed sketches and plans, even if rudimentary, are highly recommended at this stage.

C. Material Selection: Embracing Modern Aesthetics

The choice of materials plays a pivotal role in determining the overall aesthetic of your lean-to. Departing from traditional materials like weathered wood, consider incorporating contemporary options such as:

  • Metal cladding: Provides durability, low maintenance, and a sleek, modern look. Consider corrugated metal sheets in a variety of colors to complement your existing architecture.
  • Composite decking: Offers a stylish and low-maintenance alternative to traditional wood decking for the floor and potentially the exterior walls.
  • Corten steel: A weathering steel that develops a distinctive rust-like patina over time, adding a touch of industrial chic to the design.
  • Reclaimed wood: Provides a unique character and sustainable alternative. However, ensure the wood is properly treated for weather resistance.

The selection should reflect your personal style and complement the surrounding environment. The use of contrasting materials can add visual interest and enhance the overall design.

II. Construction: A Step-by-Step Guide

The construction phase demands precision and adherence to building codes. Ensuring a solid foundation is critical for a stable and long-lasting structure. While employing professional assistance is always advisable for complex projects, many aspects of lean-to construction can be undertaken by skilled DIY enthusiasts.

A. Foundation Construction

The foundation type will depend on factors like soil conditions and shed size. Options include concrete slabs, concrete piers, or a gravel base, depending on the local building codes and the weight of the shed. Proper drainage is vital to prevent water damage. A level foundation is crucial for ensuring the structural integrity of the entire shed.

B. Framing and Structure

The framing of the lean-to is relatively straightforward. Pressure-treated lumber is typically used for the framework, providing resistance to rot and insect damage. Precise measurements and cuts are essential to ensure the structural soundness of the walls and roof. The single-slope roof is supported by rafters that are attached to a ridge beam and rest on the supporting wall. Consider using engineered wood products for enhanced strength and durability.

C. Roofing and Cladding

The chosen roofing material will determine the installation method. Metal roofing is relatively straightforward to install, requiring appropriate fasteners and sealant to ensure watertightness. For other roofing materials, such as asphalt shingles or composite tiles, follow manufacturer instructions meticulously. The cladding installation follows the framing, ensuring proper alignment and overlap to prevent water ingress. Consider incorporating insulation within the walls and roof for improved energy efficiency.

D. Doors and Windows

Strategic placement of doors and windows can significantly enhance the functionality and aesthetics of the lean-to. A well-positioned door allows for easy access, while strategically placed windows provide ample natural light and ventilation. Consider using modern, energy-efficient windows and doors that complement the overall design.

III. Finishing Touches: Elevating the Design

The finishing touches are what truly transform a functional structure into a stylish and inviting space. Paying attention to detail during this phase will enhance the overall aesthetic appeal and functionality of the shed.

A. Exterior Finishes

Consider adding exterior lighting to enhance safety and security. Careful landscaping around the shed can help integrate it seamlessly into the surrounding environment. Consider the use of hardscaping elements such as pathways or patios to enhance the overall aesthetic.

B. Interior Finishes

The interior finish will depend on the intended use of the shed. For a workshop, consider durable flooring and ample workbenches. A storage shed may benefit from shelving units and efficient organization systems. Interior lighting is essential, and the type chosen will depend on the intended use. Consider adding electrical outlets for added functionality.

C. Sustainable Considerations

Incorporating sustainable practices throughout the construction process can enhance the environmental footprint of your lean-to. Consider utilizing reclaimed materials, energy-efficient lighting, and water-saving fixtures wherever possible. Proper waste management during construction is also crucial.

By carefully considering the design, material selection, and construction techniques, you can create a modern lean-to shed that transcends its functional purpose and becomes a stylish and valuable addition to your property. This guide provides a framework; remember to always consult local building codes and seek professional advice when necessary to ensure a safe and successful project.

Continue lendo

Thursday, November 21, 2024

Create a Rustic Pallet Shed with These Free PDF Plans for DIYers

Create a Rustic Pallet Shed with These Free PDF Plans for DIYers

Constructing a Rustic Pallet Shed: A Comprehensive Guide Utilizing Free PDF Plans

This document provides a detailed guide for constructing a rustic pallet shed, leveraging readily available free PDF plans. The instructions are designed for DIY enthusiasts with intermediate woodworking skills. While the use of reclaimed pallets offers a cost-effective and environmentally conscious approach, careful attention to safety and structural integrity is paramount throughout the entire process. This guide emphasizes meticulous planning and execution to ensure a durable and aesthetically pleasing result.

I. Preliminary Considerations: Planning and Preparation

Before commencing construction, a thorough understanding of the project scope and a comprehensive preparation phase are crucial. This involves several key steps, detailed below:

A. Sourcing and Assessing Pallets

The foundation of this project rests on the quality of the reclaimed pallets. Select pallets carefully, prioritizing those constructed from sound, pressure-treated lumber. Avoid pallets showing signs of significant damage, rot, or infestation. Inspect each pallet for splinters, loose nails, or broken boards, and address these issues before incorporating them into the structure. The number of pallets required will depend on the specific dimensions outlined in your chosen PDF plans; however, expect to need a substantial quantity, potentially ranging from 10 to 20 or more, depending on the shed's size and design.

B. Reviewing the PDF Plans

Thoroughly review the chosen free PDF plans. Familiarize yourself with all aspects of the design, including the material list, cutting diagrams, assembly instructions, and any safety precautions outlined. Understanding the plans fully before beginning construction is critical to avoid errors and ensure a successful outcome. Note any discrepancies between the plans and the materials you have sourced and adjust your approach accordingly. Consider making a physical copy of the plans and annotating them during the construction process.

C. Gathering Tools and Materials

Beyond the pallets themselves, you will require a range of tools and supplementary materials. Refer to your chosen PDF plans for a complete list, but common requirements generally include:

  • Measuring tape
  • Level
  • Hammer
  • Screwdriver (or drill with appropriate bits)
  • Saw (circular saw or hand saw)
  • Safety glasses
  • Work gloves
  • Crowbar or pry bar (for separating pallet boards)
  • Nails or screws (appropriate size and type)
  • Wood sealant or preservative
  • Optional: Roofing materials (e.g., corrugated metal, asphalt shingles)
  • Optional: Foundation materials (e.g., concrete blocks, gravel)

Ensure all tools are in good working order and that you have sufficient quantities of the necessary fasteners and protective gear.

II. Construction Phase: Building the Pallet Shed

This section details the core construction process, assuming a general understanding of carpentry techniques. Always refer to your specific PDF plans for precise measurements and assembly details. Safety should be paramount at all times; wear appropriate protective gear throughout the construction process.

A. Foundation Preparation

Prepare a level foundation for your shed. The chosen PDF plans might suggest various options, ranging from a simple gravel base to a more substantial concrete slab or raised platform. The stability of the foundation directly impacts the overall stability and longevity of the shed. Ensure the foundation is level and large enough to accommodate the shed's footprint as specified in the plans. Consider adding weed barrier fabric under the foundation to inhibit weed growth.

B. Pallet Disassembly and Preparation

Carefully disassemble the reclaimed pallets. Remove any loose nails or screws and discard any damaged or unusable lumber. Clean the pallet boards thoroughly, removing any dirt, debris, or loose splinters. Using a planer or sander (if available) can smooth the surfaces for a more polished appearance, though this is optional.

C. Frame Construction

Following the instructions provided in your PDF plans, construct the main frame of the shed. This usually involves assembling the wall frames and roof trusses. Pay close attention to the specified measurements and joinery techniques to ensure the structural integrity of the frame. Use appropriately sized nails or screws for secure fastening and consider using wood glue for added strength and durability.

D. Wall Cladding

Attach the prepared pallet boards to the frame, creating the shed's walls. Maintain consistent spacing and alignment. Ensure that the boards are securely fastened to the frame using nails or screws, and consider using additional bracing for added strength, particularly at corners and joints. You might choose to orient the pallets vertically or horizontally, depending on the desired aesthetic and the specific instructions in your plans.

E. Roof Construction

Construct the roof according to the instructions in your PDF plans. This typically involves assembling the roof trusses and covering them with your chosen roofing material. Ensure the roof is properly sloped to facilitate water drainage. Secure the roofing material to the trusses, ensuring proper overlap and sealing to prevent leaks.

F. Finishing Touches

Once the main structure is complete, apply a wood sealant or preservative to protect the wood from the elements and extend the shed's lifespan. Consider adding a door and windows, following the instructions in your PDF plans or using your own creative design. You might add additional features like shelving or workbenches, adapting the design to your specific needs.

III. Post-Construction Considerations: Maintenance and Safety

Even with careful construction, regular maintenance is crucial to ensure the longevity and safety of your pallet shed.

A. Regular Inspections

Conduct periodic inspections to identify and address any potential issues, such as loose boards, damaged roofing, or signs of pest infestation. Prompt attention to these problems will prevent further damage and maintain the structural integrity of the shed.

B. Seasonal Maintenance

Implement seasonal maintenance tasks, such as cleaning debris from the roof and gutters, applying additional wood sealant as needed, and checking for signs of water damage. Regular maintenance minimizes the risk of structural problems and extends the shed’s useful life.

C. Safety Precautions

Always exercise caution when working around the shed, particularly if accessing the roof or performing maintenance tasks at height. Use appropriate safety equipment such as ladders, harnesses, and fall protection devices as needed. Keep the area around the shed clear of obstructions to avoid tripping hazards.

By following these instructions and exercising careful planning and execution, you can successfully construct a durable and aesthetically pleasing rustic pallet shed. Remember to prioritize safety throughout the entire process and consult your chosen PDF plans for detailed guidance.

Continue lendo

Create Your Own Backyard Storage with These Basic Shed Plans

Create Your Own Backyard Storage with These Basic Shed Plans

Create Your Own Backyard Storage with These Basic Shed Plans

Hey there, fellow DIY enthusiasts! Are you tired of tripping over garden tools, lawnmowers, and random bits of lumber scattered across your backyard? Do you dream of a neat and tidy outdoor space, but the price of pre-built sheds has you feeling a little… deflated? Well, grab your tool belt and let's get building! This guide will walk you through creating your very own backyard storage shed using simple, achievable plans. We're talking a shed you can be proud of, without needing a carpentry degree (or a small fortune!).

Choosing the Right Shed for You

Before we jump into the construction, let's think about what kind of shed you need. Size is the biggest consideration. Do you need a small space just for storing gardening tools, or something larger to house a lawnmower, bikes, and maybe even a workbench? Consider:

  • Size and Dimensions: Draw a rough sketch of your ideal shed, noting the dimensions. Remember to factor in space for walking around inside once everything is stored.
  • Location: Where in your backyard will the shed go? Check local building codes and zoning regulations. You'll also want to consider access, sunlight, and proximity to power sources (if you plan on adding electricity later).
  • Materials: Pressure-treated lumber is a popular choice for outdoor sheds because it's resistant to rot and insects. You can also use recycled materials if you're feeling environmentally conscious (and resourceful!).
  • Style: While we're focusing on a basic shed, you can still add your personal touch. Consider adding a simple gable roof for a more charming look, or a lean-to design if you're short on space.

Basic Shed Plans: A Step-by-Step Guide

Let's assume you've decided on a simple, 6ft x 8ft shed with a single door. Here’s a breakdown of the construction process:

Step 1: Preparing the Foundation

A solid foundation is key. You have a few options here:

  • Concrete Slab: The most durable option, but requires some concrete work and potentially permits depending on your local regulations.
  • Gravel Base: A simpler and cheaper option. Just level the ground, lay down a layer of gravel, and compact it. This is fine for lighter sheds.
  • Wooden Skids: Easy to build and allows for better drainage. You'll need pressure-treated lumber.

Once your foundation is ready, you'll need to level it precisely, ensuring your shed will be stable.

Step 2: Building the Floor

For this basic shed, a simple floor frame is sufficient. You'll need pressure-treated lumber for the floor joists and plywood for the actual floor. Make sure the joists are spaced evenly and securely fastened to the foundation. Then lay the plywood, ensuring tight joints and securing with screws.

Step 3: Constructing the Walls

This is where things get a bit more involved, but still manageable. Build the wall frames using pressure-treated lumber, ensuring they're square and plumb. Remember to cut openings for the door and any windows you're adding. Once the frames are complete, sheath the walls with plywood or other suitable siding material. Make sure all pieces are securely fastened with screws or nails.

Step 4: Assembling the Roof

A simple gable roof is easy to construct. Cut and assemble the roof rafters, making sure they’re evenly spaced and properly supported. Then, attach roof sheathing (plywood works well). Finally, add roofing felt and shingles to protect the shed from the elements. Remember to consider your local climate when choosing roofing material.

Step 5: Installing the Door and Finishing Touches

Once the roof is on, install your shed door using hinges and a latch. Consider adding trim around the door and windows for a cleaner look. You can paint or stain the shed to protect the wood and enhance its appearance.

Tips and Tricks for Success

Here are a few extra tips to make your shed-building experience smoother:

  • Measure Twice, Cut Once: This old carpentry adage is crucial. Accurate measurements are essential for a well-fitting shed.
  • Use the Right Tools: Having the right tools (circular saw, drill, level, measuring tape) will make the job much easier and safer.
  • Ask for Help: Don't be afraid to ask friends or family for assistance. Having an extra set of hands can be invaluable.
  • Take Your Time: Building a shed takes time. Don't rush the process. Take breaks and ensure each step is done correctly.
  • Safety First: Always wear safety glasses and appropriate clothing when using power tools.

Beyond the Basics: Adding Extra Features

Once you've mastered the basic shed, you can think about adding some extra features:

  • Windows: Add natural light and ventilation.
  • Shelving: Maximize storage space.
  • Workbenches: Create a dedicated workspace.
  • Electricity: Add power outlets for lighting and tools (make sure to consult an electrician for this).
  • Lockable Door: For added security.

Commonly Asked Questions

Q: Do I need a building permit?

A: This depends on your local regulations. Check with your local building department to see if a permit is required before you start building.

Q: How long does it take to build a shed?

A: The time it takes varies depending on your experience, the complexity of the design, and the weather. A basic shed could take a weekend, while a more complex one might take several.

Q: What's the best type of wood to use?

A: Pressure-treated lumber is highly recommended for outdoor projects because of its resistance to rot and insects.

Q: Can I build a shed without any prior experience?

A: Yes! This guide focuses on a basic shed design that is manageable for beginners. Take your time, follow the instructions carefully, and don't be afraid to ask for help if you get stuck.

Q: How much will it cost?

A: The cost will vary depending on the size of the shed, the materials you choose, and any additional features you add. However, building your own shed is generally much cheaper than buying a pre-fabricated one.

So, there you have it! With a little planning and effort, you can build your own backyard storage shed. Happy building!

Continue lendo

DIY Pallet Shed Plans for a Customizable and Sustainable Shed

DIY Pallet Shed Plans for a Customizable and Sustainable Shed

DIY Pallet Shed Plans for a Customizable and Sustainable Shed

Constructing a shed from reclaimed pallets offers a unique blend of cost-effectiveness, sustainability, and creative freedom. This detailed guide provides comprehensive plans for building a customizable pallet shed, guiding you through each step from material sourcing to final finishing touches. The design emphasizes adaptability, allowing for variations in size and features to suit individual needs and available space.

I. Planning and Design Considerations

Before embarking on the construction, careful planning is crucial. This phase involves defining the shed’s purpose, determining its dimensions, and selecting appropriate materials.

A. Defining Shed Purpose and Functionality

The intended use of the shed dictates its design and features. Will it serve as a storage unit for gardening tools, a workshop for small-scale projects, or a combination of both? Consider the type and quantity of items to be stored. A shed designed for storing bulky equipment will require a larger footprint and potentially reinforced framing compared to one primarily used for smaller items.

B. Determining Dimensions and Layout

The shed’s dimensions should be carefully chosen based on available space and storage requirements. Standard pallet dimensions (typically 48” x 40”) will significantly influence the overall design. A detailed floor plan should be drafted, considering the placement of shelving, workbenches (if applicable), and the location of the door for optimal accessibility. Consider the need for windows for ventilation and natural light.

C. Material Sourcing and Assessment

The foundation of this project relies on reclaimed pallets. Sourcing high-quality pallets is paramount. Inspect each pallet meticulously for signs of damage, rot, or pest infestation. Prioritize pallets made from treated lumber, though always verify the type of treatment used. Avoid pallets marked with the 'HT' symbol (heat treated), as this often denotes a chemical treatment unsuitable for direct skin contact or prolonged exposure. You will also need additional materials such as screws, nails, plywood for flooring and roofing, and any desired finishing materials.

II. Foundation and Base Construction

A solid foundation ensures stability and longevity for your pallet shed. This section outlines the steps involved in creating a robust and level base.

A. Site Preparation and Leveling

Begin by clearing the designated area of debris, vegetation, and any uneven ground. Level the ground using a shovel and rake, ensuring a flat surface for the foundation. Consider using a spirit level to verify its evenness.

B. Foundation Options

Several foundation options exist, depending on soil conditions and budget:

  • Concrete Slab: Provides the most stable and durable base but requires significant effort and expense.
  • Gravel Base: A cost-effective option involving laying a layer of compacted gravel to provide drainage and level the ground.
  • Wooden Skids: Simple and inexpensive, using treated lumber skids to elevate the shed from the ground, improving drainage and preventing ground rot.
  • C. Pallet Base Construction

    Once the foundation is ready, begin laying the pallet base. Ensure the pallets are placed level and securely fastened together using appropriate screws or nails. This base will form the floor of the shed. You may need to cut or modify some pallets to fit perfectly.

    III. Wall and Roof Construction

    This crucial stage involves assembling the walls and constructing the roof, creating the structural integrity of your pallet shed.

    A. Wall Frame Assembly

    The walls are constructed by stacking and securing pallets vertically. Use long screws and reinforce the connections for added strength. Consider staggering the pallets to create a more visually appealing and structurally sound wall. Remember to leave openings for doors and windows.

    B. Door and Window Installation

    Install the door and windows within the designated openings. Ensure that the door fits securely and the windows are properly sealed to prevent drafts and moisture intrusion. You may need to fabricate door frames and window frames using additional lumber.

    C. Roof Framing and Covering

    Construct the roof frame using appropriately sized lumber. The roof design can be a simple gable roof or a more complex design based on personal preference. Cover the roof with plywood and then apply roofing material such as asphalt shingles or metal roofing to ensure water resistance. Ensure proper slope for drainage.

    IV. Finishing Touches and Customization

    The final steps involve adding finishing touches to enhance the aesthetic appeal and functionality of the shed.

    A. Interior Finishing

    Once the shed’s structure is complete, you can add shelving, workbenches, and other interior fixtures. Consider adding lighting for improved visibility. Apply a sealant or paint to the interior walls for added protection.

    B. Exterior Finishing

    Apply a suitable weather-resistant sealant or paint to the exterior to protect the pallets from the elements and enhance the appearance of your shed. Consider adding trim to cover any gaps or improve the overall aesthetic. You might also incorporate landscaping features around the shed to enhance the overall look.

    C. Customization Options

    The versatility of pallet construction allows for extensive customization. Incorporate features such as a loft for additional storage, a small windowed area for potting plants, or decorative elements to create a personalized and unique structure. Consider adding features like rain gutters and downspouts to divert rainwater effectively.

    V. Safety Precautions

    Throughout the construction process, prioritize safety. Wear appropriate safety gear including safety glasses, work gloves, and sturdy footwear. Use caution when handling power tools and ensure that the work area is adequately lit and free from obstructions.

    Building a DIY pallet shed is a rewarding project that allows for creativity and sustainable practices. By carefully planning, assembling, and finishing the structure, you can create a functional and visually appealing addition to your property, minimizing environmental impact while maximizing personal expression.

    Continue lendo
     

    DIY shed felt

    -->